(If you haven't yet installed Input Director on your systems head over to the Quickstart Install Guide to show you how.)
1. Using Input Director
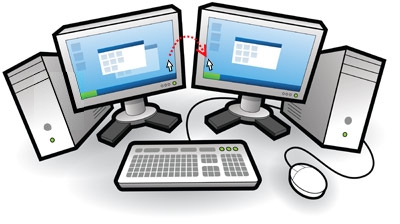
Now that Input Director is up and running and configured on your master system and your slave system you can start using it:
1.1 Transitioning between Systems using the Mouse
Assuming you had configured your slave as being to the right of your master system (go back and look
here if you're not sure what side you've configured your slave on) then using your mouse you should be able to move your cursor to the right so that it goes beyond the right-side of the screen, it should disappear and re-appear on your slave screen. Anything you now type will be sent to the slave system. To switch back to the master system, simply reverse the process and move the cursor to the left side of slave screen and keep going until it re-appears on the master system.
For transitions using the mouse, there are a variety of transition options that can be set:
- Requiring that the cursor is tapped twice on the side of the screen to transition to the next screen
- The cursor must be pressed against the side of the screen for a moment to cause a transition
- A key(s) must be held down to permit the cursor the transition to occur
Using one of the features can help if you find your cursor often unintentionally slipping across to other systems. Select the mode of transition from the
Master Preferences screen.
1.2 Transitioning between Systems using hotkeys
If you've
set a hotkey for the slave, you can use that by hitting your hotkey combination. The cursor should appear in the center of the slave screen and you'll find that your mouse and keyboard input is now being redirected to the slave system.
You can also set up hotkeys to move the cursor between systems by their relative positions: left, right, up and down. These hotkeys are configured on the
Master Preferences screen.
There is also a hotkey to return the cursor to the Master (see next section)
1.3 Recovering the cursor to the Master

If you wish to use a hotkey or if you start an application on the slave system and the system freezes and you need to return control to the master system, the default hotkey is left ctrl + left alt + control-break (control-break is the key marked pause/break to the right of the scroll-lock key on a standard keyboard). You can change this hotkey from the Main Input Director panel:
If things get really stuck, you can do a ctrl-alt-delete to regain control of input.
1.4 Startup Options

When you first install Input Director, it will be set to automatically start itself when Windows is started, but it won't be set to start up in either master or slave mode. Once you've decided which system will be the master and which will be the slave, you need to tell Input Director to start itself in the appropriate mode:
Change whether Input Director should be a slave or a master on startup from the Global Preferences tab.
To be able to control a slave prior to logging into it, you must have set Input Director to run on startup and be enabled as a slave
1.5 Managing when slaves are available
On the Master Configuration panel, a slave can be temporarily marked as one to be "skipped" when transitioning between systems. For example:

In this screenshoot the slave "jane" is positioned between bob and the Master system but has its Skip flag checked. When moving the cursor between the Master System and the remaining slave, Input Director will treat the "jane" system as if it doesn't exist. A slave's skip flag setting is temporary and not remembered between restarting Input Director or rebooting the Windows system.
You can quickly unskip a slave by using its hotkey to switch over to it. If the switch is successful, the slave's skip flag will be cleared.
Once you have Input Director running and configured it is beneficial to turn on the "Default all slaves to skip on startup". With this option on, all slaves are set to be skipped on startup. When a slave system becomes available (for example you boot a slave computer) it will attempt to communicate with the Master and let it know that its now available. The master will then automatically 'unskip' the slave and let you know that it is now available. This option will help to avoid transitioning to a slave that is not yet ready. Slaves will inform their Master if they're being shutdown or rebooted and the Master will accordingly 'skip' them.
To learn more about slave skipping, have a look
here in the FAQ.
1.6 Using the Shared Clipboard
Using the shared clipboard across systems is as simple as using the Windows clipboard normally. Copy the content on one system, transition across to another system and paste. Input Director supports most clipboard data formats.
To be able to copy/paste files, the files that are to be copied must be accessible via network shared directories. Input Director supports WIndows O/S security and as such, the user logged in on the target system must have permission to read the files using the network share.
More information on the
shared clipboard can be found in the FAQ
1.7 Locking a System using Win-L
On Vista and newer, using Win-L to lock your system will always lock the Master, regardless of which system you're controlling at the time. To simulate Win-L on a slave, use Ctrl-Win-L instead (this hotkey will also work on the master). You can change this hotkey on the
master preferences screen.
1.8 Ctrl-Alt-Delete for a Slave
Hitting ctrl-alt-delete will always activate on the master, regardless of which system you're controlling. To simulate ctrl-alt-delete on a slave, use ctrl-alt-ins (this will also work on the master). You can change this hotkey on the
master preferences screen.
If you right-click on the "ID" icon on the notification status bar, you will be presented with a shortcut menu that lets you disable/enable Input Director, shutdown it down, etc:
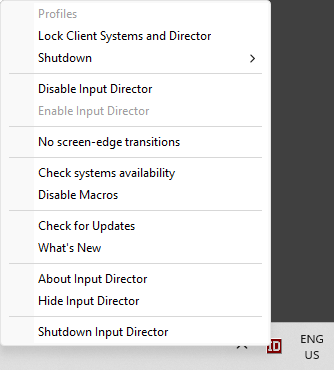
On the Master system, the option "Shutdown Slaves and the Master" provides a shortcut to turning all the systems off. (A slave must have its "Shutdown this slave if directed to by the Master" option set).
Click here to see more information about this slave setting. The "Lock Slaves and Master" operates similarly.
If Input Director is hidden, you can double-click the left mouse-button on the "ID" icon to display the Input Director window.
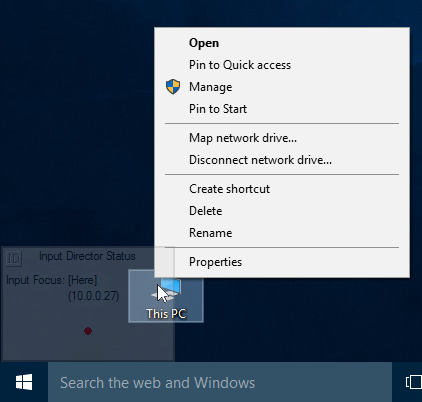
1.10 Opening a file on a different system
If you often find yourself opening/editing files that are located on one of your other computers, Input Director makes it easy to open a file or directory on any other master/slave computer.
Using Windows Explorer, if you right-click on a file or directory that is accessible via a network share, an Input Director menu item will be included in the pop-up menu.
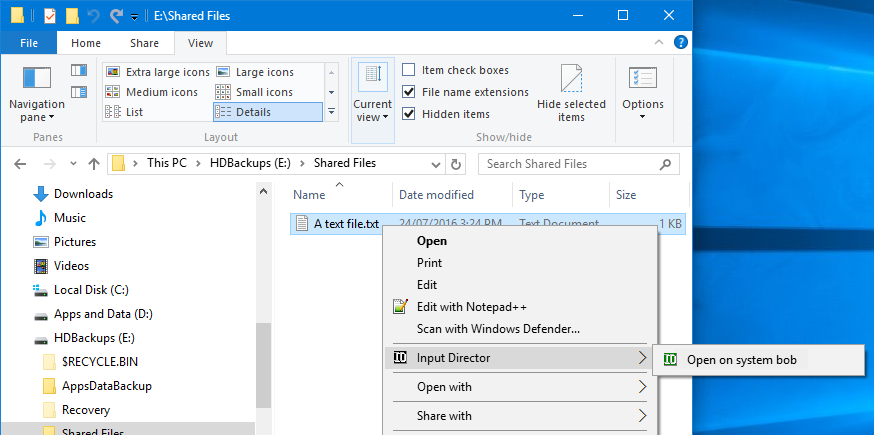
You can then elect to open the file on one of your other Input Director computers. If you hold down left-shift when right-clicking on the file, Input Director will also switch input control to that system.
2. Preferences
2.1 Global Preferences
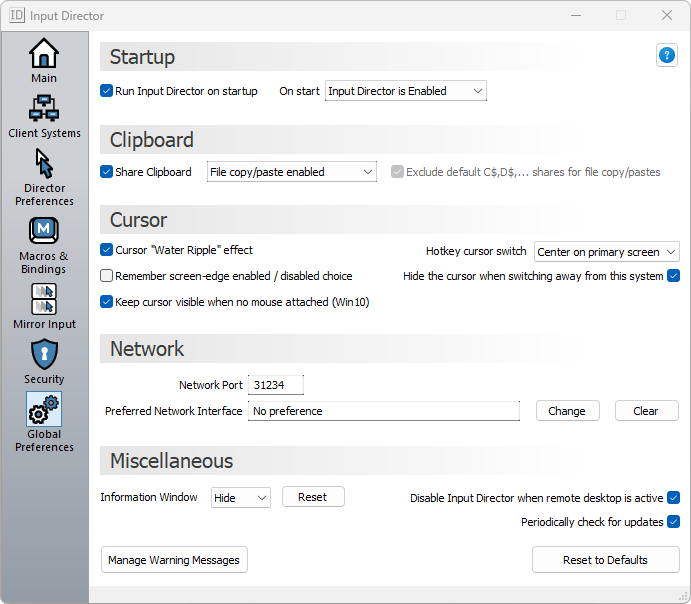
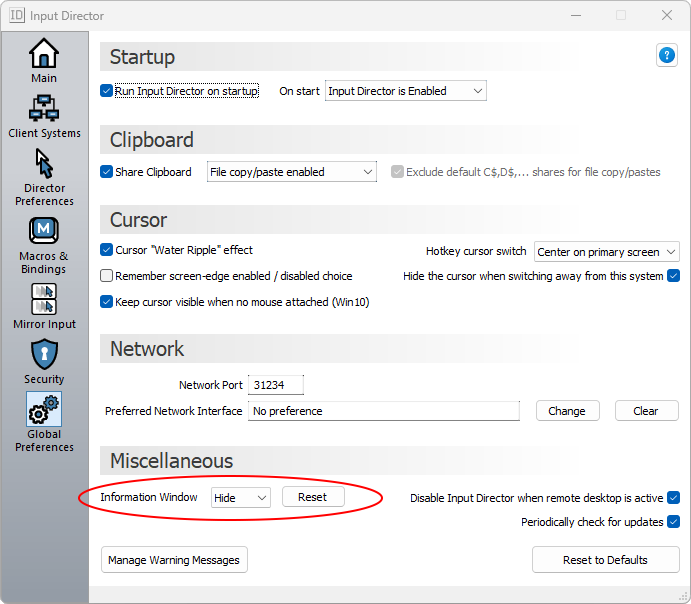
On installation Input Director will be configured so that it is automatically started when you turn on your system. By default, it will start up in "disabled" mode rather than as a Master or Slave. To change this open the Input Director window and switch to the Global Preferences tab, you will see:
 Startup -
- If you don't want Input Director to be automatically started by Windows when you login, uncheck the "Run Input Director on Startup" box.
- If the "For All Users" option is selected then the "Run Input Director on Startup" option choice affects all users. e.g. Check both options to have Input Director automatically run for all users on startup.
- To have Input Director automatically switch into slave or master mode when it is started, choose the appropriate radio button next to "On start:".
- Note: To be able to control a slave prior to logging into it, you must have set Input Director on that slave system to 'run on startup' and be 'enabled as a slave'
Shared Clipboard - Check the "Shared Clipboard" box for this system to share clipboards with all participating slaves and the master. Clipboard file copy/pastes require that the files being copied are available via a Windows network shared directory and that the security has been setup such that the user logged in on the destination machine doing the copying can access the files.
A file to be copied doesn't need to have its immediate directory shared. For example, a file called "mydoc.txt" located in C:\Documents\Biz\, could have the "Biz" directory setup as a shared folder, or the "Documents" or even the C: drive's root folder, as long as the user on the other machine doing the pasting has appropriate access. When files are copied to the Input Director shared clipboard, Input Director looks through the list of shared directories on the system with the files and assesses which ones are available via network shared directories. If given a choice of shared directory, it will always pick the most immediate to the file. For example - if C:\Document\Biz has been shared as well as C:\Document, then C:\Document\Biz will be picked as this is the most immediate (closest) directory to the location of the file.
Under global preferences, there is an option to exclude "C$, D$ shares". These are Windows administrator shares that are setup by Windows and by default have very limited access. Because the access is so limited, checking this option will cause Input Director to ignore them when considering whether a file is available in a shared directory. If you did want to setup shares for for whole C: or D: drive, you are best of creating a new read-only share on the root directory and setting appropriate security permissions.
Preferred Network Interface - If your system has multiple network connections (For example, it is connected via ethernet to a LAN and it also has a modem connected to it, or it is wireless and also is connected to a network via ethernet) this setting allows you to choose a preferred network interface when communicating with slaves and masters. This choice is a preference in that, as an example, if on a master you have set your ethernet connection as the preferred interface, but the slave its trying to communicate with is only available via wireless, then the preference is ignored. This is an advanced option and should only be set if there are communication problems and the master and/or slaves are not able to connect to each other or the remote clipboard isn't working (e.g the clipboard is only working one direction but not the other).
Miscellaneous options -
- Auto-switching lets you use the keyboard/mouse attached to any computer to control any other computer. This is achieved by configuring both the slave and master settings in Input Director, on every computer. More information on how to set up auto-switching can be found here.
- When switching to a system (master or slave) via a hotkey the cursor is centered by default. You can choose not to have the cursor centered when you switch away from and then back to the system using hotkeys. Note: With this option on, the cursor will still be centered if you use your mouse to transition away from the system and a hotkey to switch back.
- If you find the visual transition effect annoying you can switch it off for this system by unchecking the Cursor "Water Ripple" effect box.
- If you want to ensure that standard users cannot change the Input Director configuration, check the "Only Administrators may change settings". Only users that are local administrators can then make changes.
Suppress Warning Messages - Clicking on the "Suppress Warning Messages" button will pop-up the following window:
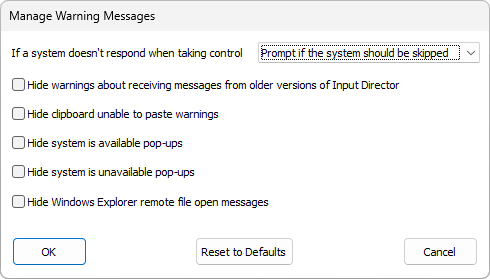
You can choose which information and warning messages are suppressed. The "Inform and automatically set slave to skip if it doesn't respond to this master" option deserves special mention - If you attempt to transition to a slave and its unavailable, the Master will pop up a window and ask you if you wish to skip this slave. By turning this option on - the system will no longer prompt you and will automatically skip the unresponsive slave. A callout message will appear (and will disappear after about 10 seconds) from the "ID" icon on the task bar informing you about the change in slave status.
2.2 Slave Preferences
The Slave Preferences are located in the bottom third of the 'Slave Configuration' tab:

These 4 settings are only active when Input Director is in slave mode:
- A Master can request to all slaves that they shutdown (This is initiated on the Master via the "Shutdown Slave Workstations" button on the Main panel or via the "ID" icon's context-menu). Each slave can be set as to how to respond to this request. Up to 4 alternatives are provided: Do Nothing, Stand By, Hibernate and Shutdown. Only those choices that are valid on a particular system are shown.
- Synchronise locking this slave system with the Master - If the Master system has the input focus and the Windows-L command is hit, the Master system will be locked. Any slave that has this checkbox selected will be locked at the same time.
- Synchronise the screensaver with the Master System - a slave's screensaver will be switched on and off in lockstep with the Master's. Note: There can be 30 second gap between the master's screensaver activating and a slave's.
- Hide the cursor when switching away from this slave - With this checkbox selected, the cursor will be hidden when transitioning away from the slave. It can be made to reappear by transitioning back to it or by moving the locally attached mouse. Also, it will reappear after 30 minutes of inactivity on the slave.
2.3 Master Preferences
On your Master system, start Input Director and switch to the the "Master Preferences" tab:

Master Preferences are segregated into 3 categories:
2.3.1 Mouse / Keyboard Preferences
- By default, the Master's keyboard caps lock, scroll lock and numlock lights reflect the system currently being controlled. To switch this feature off, uncheck the "Master Keyboard LEDs reflect the status of the directed slave" option
- Use this system's mouse preferences - When controlling a slave, by default, the mouse speed set on the slave's computer is used. By selecting this option, the master's Windows mouse settings are used when controlling slaves.
- Use this system's keyboard layout - By default, Input Director will respect the keyboard layout option set on a slave when controlling it. Turn this option on to override the slave's keyboard layout and to use the master's instead. This is useful if you have different keyboard layouts on your master and slaves. More information on this feature can be found here in the FAQ.
- Ctrl-Alt-Delete equivalent - If a slave system has input focus and you wish to do the equivalent of ctrl-alt-delete, a different key combination is necessary (as typing ctrl-alt-delete will always occur on the Master system even when input is with a slave). The default hotkey is ctrl-alt-insert. This key combination will also work on the Master system.
- Win-L equivalent - If you're running Vista (or newer) on your systems you need to use this hotkey (defaults to Ctrl-Win-L) to lock a slave (as using Win-L will lock the Master even if you're controlling a slave)
2.3.2 Transition Options
- You can set a key (or keys) that must be depressed / held down for a screen-edge transition to occur (That is, being able to move the cursor off the screen to the right or left and have it appear on another system). This is one of the alternative options Input Director offers to help avoid the cursor slipping between systems when you don't intend it. This option can be used in combination with double-taps and cursor lingers (see the options below) A good choice of key for this option is the shift key (which means that the shift key must be held down whilst moving the cursor off the screen on the master and the slaves to cause it to switch to the another system).
- It is sometimes desirable not to allow screen-edge transitions (e.g. a full-screen game is running on your system). Toggling screen-edge transitions on and off can be achieved by right-clicking on the "ID" icon on the system in question and selecting the "No screen-edge transitions" menu item. You can also setup hotkeys from here to achieve the same result. When using the hotkeys they can enable/disable screen-edge transitions on the system that is currently being directed (master or a slave).
- Hotkeys can be setup to jump left, right, up and down from one system to another, or to cycle through them.
- Rather than have the cursor immediately transition to another system when its at the edge of the screen, you can set the transition option to either double-tap or linger. If double-tap is active, you must hit the side of the screen twice quickly to cause a system transition. You can choose how quickly the double-tap must occur. Alternatively, by enabling "cursor lingering", the cursor must be pressed against edge of the screen for a minimum amount of time before a transition will occur. These options can be used in combination with the depressed keys option above, so that, for example, the shift key must be held down at the same time as double-tapping the edge of the screen to cause a transition.
- Don't allow transitions near a monitor's corner. With this option switched on, no transition can occur between systems when the cursor is in close proximity to the corner of a monitor.
2.3.3 Advanced
- If you have a Logitech (or other brand) keyboard that has built-in macros you may wish to record an Input Director macro and bind its hotkey to one of your configurable keys. The "Logitech keyboard compatibility mode" option needs to be checked to allow your keyboard's configurable keys to trigger Input Director macros.
- Rescan slaves when resuming from standby - When enabled, a master system resuming from standby/hibernate, will scan all the slaves and update them accordingly based upon their availabilities.
- An Input Director Master communicates in the background with slaves on a regular basis (e.g. to switch the screensaver off/on, to update a slave's information window, etc). If it cannot resolve the slave's hostname it will automatically mark it as being unavailable. If you do not wish Input Director to mark slaves as unavailable as part of its background activities then check the "Do not automatically update a slave's unavailability status" option.
- Every time a transition occurs directing input to a slave, that slave's hostname is looked up. For some systems this can cause a noticable pause. By checking the "Use cached slave IP addresses" option, Input Director will only look the slave's hostname up once and then cache this information for future transitions. This caching can be a problem in rare situations in which the slave's IP address changes throughout the day.
- Time to wait for a slave to respond - When Input Director communicates with a slave to transition control to it, it will wait up to the time set here for a response. If the slave does not respond in time, then it will prompt you as to whether you wish to skip this slave.
- Check offline slaves availability - You can set the master to check if any unavailable slaves are now available periodically (from every 10 seconds through to 30 minutes, or never). This option should only be turned on if there are issues with the master recognising the availability of a slave. By default a slave will attempt to communicate with a master on startup to inform it that it's now available. It will also inform the master when it is no longer available (as the slave is being shutdown or rebooted). For the majority of cases this capability will ensure that the master is regularly updated and it will not need to periodically check the status of its slaves.
Note: If you don't want a particular slave checked (one that perhaps is available but you to want skip it nonetheless) then set the 'skip' flag against that slave in the Master Configuration.
3. Auto-switching roles - using any keyboard/mouse to control any system
If you choose to leave the keyboard & mouse attached to your slave, you can take advantage of Input Director's auto-switching feature. Auto-switching allows computers to change roles automatically between master and slave. You can then use the keyboard/mouse on any of your computers to control any other.
With auto-switching turned on:
- A system will switch to master mode when the mouse attached to it is used.
- A system will become a slave when an authorised master communicates with it.
To set up auto-switching, you need to setup
both the master and slave configuration in Input Director on
every computer.
For example, if you have two computers - one named bob and the other jane. You would run through the
configuration steps in the quickstart installation guide setting up bob as the master and jane as the slave. And then run through the process again but this time set up jane as the master and bob as the slave. Make sure that you can manually
enable bob as a master and
jane as slave and that you can use bob's keyboard/mouse to control jane. Then switch their roles, manually
enable bob as the slave and
jane as the master, and test that you can control bob using jane as the master.

To enable auto-switching, open Input Director, switch to the Global Preferences tab and enable auto-switch. Do this on
all your systems.
Now, when you use the mouse attached to a particular computer, that computer will automatically become the master and can be used to control the other system(s).
4. Information Window
The master and slave systems can display an Information Window, which indicates Input Director's status and which system currently has the input focus. To control the information window, switch to the "Global Preferences" tab. There is a "Show" push button which can be selected and deselected, and a "Reset" button to reset the Information window back to its defaults.
Press the "Show" button and the Information Window will pop-up in the bottom-right hand corner of the screen:
 If the window doesn't pop-up, make sure that Input Director is enabled as a Slave or a Master. By default, if Input Director is disabled the window will remain hidden.
When input switches from one system to another, all Input Director's displaying the information window will be updated. For example:

The information window can be resized by positioning the cursor on the edge of the window (the cursor will change to a double-headed arrow), holding down the mouse button and dragging the mouse. The contents will be scaled accordingly.
The window can can re-positioned by putting the mouse anywhere in its center and then holding down the mouse button. The cursor will change to a four-headed arrow and the window can be moved to a different location.
The preferences for the Information Window are found in its context menu. To open this menu, right-click on the information window:
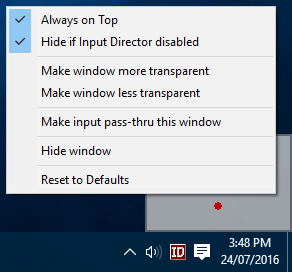
From here you can make the window more or less transparent, uncheck the "Hide if Input Director disabled" flag so that the window is always visible, or uncheck the "Always on Top" flag so that other windows can obscure it.
If you select "Hide window" and you change your mind, you'll need to return to the Global Preferences tab in Input Director and re-press the Information Window's "Show" button to redisplay it.
"Make input pass-thru this window" means that once enabled, any clicks on the information window will pass through it to any window or the desktop below it as if the Information Window isn't there. This means that once you have enabled this option you
cannot resize, reposition, change the transparency of the Information Window, as you will not be able to right-click on it to bring up the context menu. To be able to change it again you must bring up the Global Preferences tab in Input Director and click the Information Window "Reset" button.
The idea behind the "Make input pass-thru this window" is that once you have sized and positioned the Information Window, this option can be selected and then it will not interfere with the control of other windows, icons on the desktop, etc even if it is overlaid on top of them:
5. Setting up Data Security Encryption
If you are using Input Director on a network that isn't secure or closed, you can choose to enable data security to encrypt the information sent between masters and slaves. Input Director uses the
Advanced Encryption Standard cipher to encrypt data.
Enabling encryption may cause the mouse or keyboard to feel less responsive on older hardware. This is because all the input information sent across must be encrypted by the master and then decrypted by the slave before it is used. This can also impact the remote clipboard as this data will also be encrypted and decrypted on the fly.
Encryption is configured on a per-slave basis. So you can choose to only encrypt data to one slave but not another. Also, you can set a different password for each slave if you wish.
If you have multiple slaves and you want to have data security active for all of them, you need to run through the following process for each slave.
To setup encryption:
i. Open Input Director on your slave and switch to the Slave Configuration 'tab':

The unlocked padlock indicates that the slave does not have encryption active.
Press the "Change" button to bring up the 'Set Security' dialog box:
ii. Change the Encryption field to 'AES Encryption', select a key length and choose a password:
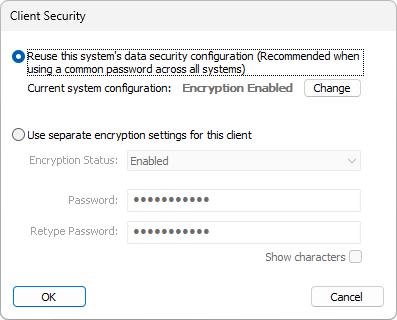
The longer the key length the more secure the data. But this also may impact a systems responsiveness on older hardware. The best thing to do is give it a try and see if you notice any slowdown and then adjust accordingly.
Input Director does not enforce password standards (such as a minimum length or a mixture of alphabetic and numeric characters). You must ensure you pick a difficult to guess password. It is recommended that a password is at least 8 characters and contains one or more non-alphabetic characters. Passwords are case-sensitive.
Click 'Okay' to activate encryption on the slave.
iii. The encryption is now active on the slave as indicated by the padlock and description:

iv. The slave configuration on the Master must now be updated:
Open Input Director on the
Master and switch to the 'Master Configuration' tab:

Select the slave that now has data security and press 'Edit' to open up the 'Slave Configuration' window:

Click the 'Change' button to set the corresponding data security settings for the slave
v. Set the Encryption, key length and password to match the same as the slave's:
Click OK to save your changes
Input Director will now attempt to communicate with the slave. If the password or keylength doesn't match the slave then a message will pop-up explaining which part doesn't match. This check is also made when you click the 'Scan Slaves' button at the bottom of the Master Configuration tab
If there is a mismatch between the data security encryption set on a slave and its configuration on the master, the master will automatically 'skip' that slave.
If your slave does not have a keyboard/mouse attached to it, always change the data security on the slave first. Then update that slave's security settings on the Master. 6. Keyboard Macros

Input Director has the ability to record and playback keyboard macros. A keyboard macro is a stored sequence of keystrokes that can be played back whenever triggered. In the case of Input Director, a macro has a hotkey assigned to it and this is used to trigger the playback. Macros can be played back to the system which currently has input focus, only to slaves or the master system, to a specific slave, or to all the systems.
Macros are managed by the Input Director application on the master system. Its from here that the recording of macros, the playback and their configuration are handled.
The Input Director macro system is not designed to be a fully-fledged Windows based macro solution (there are many alternatives available, which can be found via your favourite search engine). Rather, it provides a mechanism to record keystrokes (nb: mouse movements/button clicks are not recorded) and play them back to a master or over the network to a slave system. (Nb: If you have 3rd-party Macro automation software installed, it may be possible to record an Input Director macro to playback a keystroke/sequence that is a trigger to activate one of the automation software's macros).
Macros have many uses. For example, you can record a macro to startup an application (by recording a key sequence that opens the Windows Run dialog box by hitting the Win-R key combination and then typing in the name of an application to run) or controlling the audio volume (this can be handy if your speakers are attached to one of your slave systems as you can take advantage of recording macros that are then bound to that specific slave), etc. In fact, most things that can be entered via the keyboard can be recorded as macro.
To learn more about using Input Director macros have a look at the
Q&A on Macros in the FAQ.
7. Key Bindings

Input Director lets you permanently bind a key to another system. This can be useful if, for example, you have speakers attached to a slave. Using key bindings, you can bind the volume up and down media keys on the master's keyboard to that slave.
Bound keys will always operate on the system they're bound to, regardless of which system is being controlled at the time.
A bound key cannot be used as part of any Input Director hotkey. If you do bind a key that is also used as part of a hotkey, the hotkey will no longer work. 


 1:55 AM
 Ahsan Mirza


 Posted in:


